Jointer vs Planer

Jointers flatten, Planers control thickness, Both smooth wood

When it comes to woodworking, there are two popular tools that are used and often get confused with each other: the jointer and the planer. Although they have different purposes, they both play important roles in preparing wood for shop use. .So, what exactly are they and how do they differ?

Jointer showing how the wood motion is controlled to make a flat face

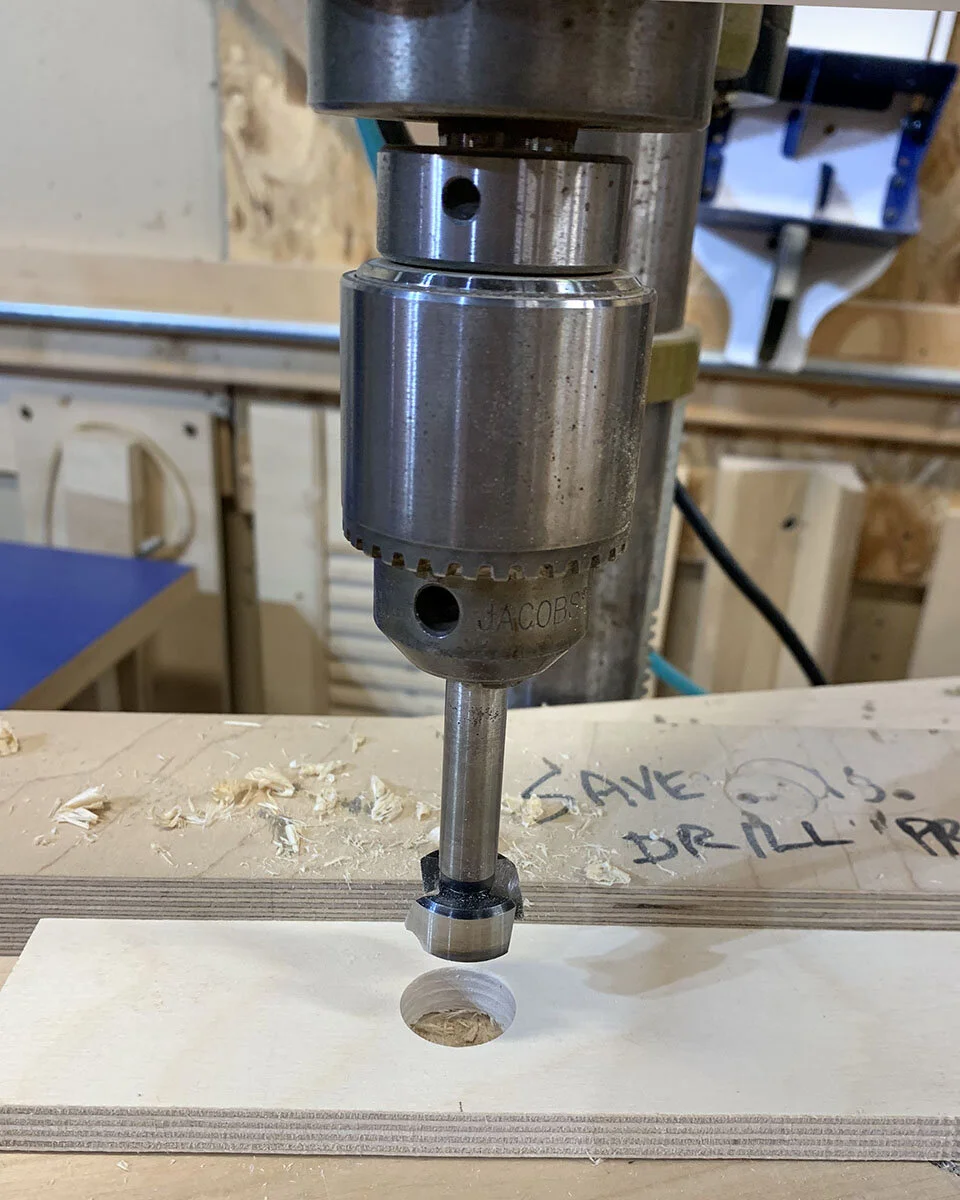
Planers have the cutter head ABOVE the table. The material is passed through the gap between the table below and the cutter above. The space between is set to a scale with a wheel and produces the set thickness

Jointers

How do jointers work?

The jointer is used to create smooth flat planes on any face or edge of a rough piece of wood. It does this by guiding the wood across a cutter using two flat surfaces to keep it from tipping out of the plane as it travels

Jointers cannot control how thick or wide a board turns out to be

Planers

The planer is used to reduce and control the thickness of a piece of wood while also producing a smooth, but not necessarily flat surface.

Planers cannot create a flat surface unless the board already has at least one flat face.

Wood Planer

Whether you are a seasoned pro who works with wood for years or just getting started with DIY woodworking projects at home, sooner or later you will need a wood planer. Wood planers smooth surfaces and control the thickness.

Planer and Jointer Equipment

So, how do these two complimentary tools work together? Jointer flattens one face, planer copies that flat face to the opposite side. Both machines are needed for making lumber flat and to a given thickness. 

If you're not sure if you want to invest in a planer or jointer, don't worry - you can always rent one! That way, you can try it out and see if it's the right tool for you before making a purchase.

That’s why woodworkers. hobbyists, and professionals alike have chosen as their go-to woodworking shop.

IsGood Woodworks provides a professionally equipped shop for rent, so whether you're just starting out or you're a seasoned pro, we have everything you need to get the job done.

With IsGood Woodworks, you'll be able to get the most out of your woodworking experience. You can also find expert coaching and guidance from expert woodworkers. 


The simplest extension cord storage and cord organizer idea to save space and time

The problem: Extension cords come in all different lengths, and every shop needs a good range of sizes. Nobody makes a one size fits all cord holder, so you end up with a messy mass of cords all unwrapped and tangled in the drawer. It can be enough to make your head explode.

Here is a very simple extension cord holder that you can make to suit any length in no time at all. We started by cutting lengths of ½” scrap plywood 3” x 12” for the short cords, and 18” for longer cords. Next we drilled 1” holes on the centerline about 4” from each end.

20_11_21 Extension cord trick 03.jpg

Then we set the band saw fence at 1” and cut out the section from the end to the hole. That’s all there is to it.

20_11_21 Extension cord trick 04.jpg

Here is the much improved outcome:

20_11_21 Extension cord trick 05.jpg
20_11_21 Extension cord trick 07.jpg
20_11_21 Extension cord trick 08.jpg

7 Essential steps to process raw lumber flat, straight and to dimension

Quick steps to flatten wood

Flaten Wood.jpg

Looking for easy to follow steps to flatten wood? This quick guide with video tutorials will show you the exact steps needed in order to process raw lumber and flatten wood.

By the end of this free training you will have what you need to begin building fine furniture, millwork, and any other high quality woodwork.

Each section and step below is accompanied with text and video training.

Flattening wood: What you need to know before you start

In the process that produces kiln dried rough lumber, each step can add twist, cup and bow warp. It is not flat. Since the lumber is long the curve extends outside of an imagined flat board of standard finished thickness.

Manufacturers make finished lumber smooth faced and to a standard cross section, but they cannot make it flat without cutting it too short to be sellable.  

Most shop projects require flat straight lumber of precise cross section dimensions. Since we know what our lengths will be, we can cut our boards shorter, then flatten them.

You cannot buy it flat, but you can buy it at full rough thickness, or very lightly planed with a smooth surface. Shops buy their lumber as either rough sawn, or “hit and miss” that is lightly planed to a still thick standard but mostly smooth.

1. Buy wood milled for commercial shops

You will usually need to source your wood commercially or at a specialty shop for recreational woodworkers. Here in Seattle we have the rare advantage of a lumber yard that sells the commercial products in a retail environment where you can pick it yourself.

2 Rough saw the wood slightly oversize

For each cross section dimension in your batch rough saw enough pieces from material that is thicker than the finish dimension. Each set of rough material should match the width + ⅜” and the length + 6”.

You are making material, NOT the actual length required. 

Do not rough out much longer than about 4’ unless the finish size is greater, and do not rough out less than about 18” since anything shorter will be hard to control.

As an example, you may need 5 pieces 6” long, and two pieces 30”, actual finished length. You would rough out one 36” piece for the 6” pieces and two 36” pieces for the 30” pieces. (5 x 6 = 30 plus two more at 30 require 3 pieces at 36”)

3. Test and mark the wood for crown and twist warp

To mark the wood with subtle precision you need a flat surface to set the wood on and test it by seeing how it rocks on the flat surface. Visual testing only gets you so close, and it is nearly impossible to detect twist by eye.

Genuinely flat surfaces are rare and usually have to be built intentionally with flatness in mind. Every jointer has two flat surfaces, and for longer pieces a good flat table is needed.

Our symbols for marking up the wood allow you to see exactly how to hold each piece to avoid rocking as you feed it over the jointer by hand. If the wood tips out of a flat plane while passing it over the jointer it will not come out flat.

4. Joint concave face flat

Jointers are used to produce flat faces and straight edges on lumber. Using the marking from step 3 above you joint the face opposite the crown (the hollow side of the bow) to produce the first flat surface. 

The video in section 3 gives you good instructions on how to hold the wood when feeding it over the jointer, and this section provides a good visual of the jointer’s cutting action

5. Plane convex face flat

Planers make a smooth surface and are used to produce a given thickness. They will copy whatever shape exists on the bottom to the top, therefore the jointer must first flatten one face..

6. Joint one edge straight

Now that the board is flat on both faces it is ready to return to the jointer to straighten one edge. At this point either face can serve to help guide the travel over the cutter. Both the table and the attached fence are used for control. The board is stood on edge on the table to produce straightness, and pressed against the fence to make sure the edge is ninety degrees to the face.

7. Use the table saw to rip to final width

The planer copies a flat face to the opposite face and the table saw copies a straight edge to the opposite edge, with the straightened edge held against the table saw’s rip fence. The rip fence is set to the desired final width, as the planer was set to the desired thickness. 

The wood is now flat straight and to dimension, ready to cut to length.

For more woodwork training and tips, make sure to check this site frequently. You can also take advantage of our shop membership and subscription packages where you will get access to a large shop with high quality commercial equipment along with expert mentoring so you can build your woodworking projects with confidence.

Check out the available woodworking packages and get started today

Jointer Training

The jointer is the second of the three most important machines in a woodworking shop. It enables the woodworker to produce flat and straight faces and edges on raw lumber, which always comes with some warp and twist. This video teaches you the basic function of the jointer, as well step by step for measuring, marking, and flattening a rough board.

Thickness Planer Training

The thickness planer is designed to produce a board of a constant thickness, depending on a movable table and a scale to set the thickness. The table adjusts in height to vary the distance between it and a cylindrical cutter head that is mounted above the table. As wood is fed into the planer it is picked up by a powered feed roller that presses it down and carries through the planer under the cutter head. Any part of that board that is thicker than the distance from table to cutter head will be machined off to produce a constant thickness.

Thickness planers cannot produce a flat board with no warp unless one face has already been flattened with a jointer.

Miter Saw Training

Miter saws are for “crosscutting” or cutting cutting across the grain of wood (or across the shorter direction if the material has no grain). Miter saws are designed to crosscut at an angle, which is called a miter cut. They are quick to use, and also capable of precision finish cuts. A miter saw would be the first choice for cutting a picture frame.

Panel saw training

The sliding panel table saw is essential for any for profit cabinet making shop. Panel saws of this type are equipped to cut a perfect straight edge up to 10’ long, then slice it into strips of various widths. Those strips are then crosscut to quickly produce all the parts for a cabinet or set of cabinets with high precision. Panel saws are equipped with a special scoring blade that eliminates unsightly surface tear out.

Band Saw Training

Band saws handle almost any full saw cut a woodworker might need to make. The band saw can be a workhorse when cutting lengthwise (ripping) and is capable of cutting all the way through a board held on edge (re-sawing). IsGood Woodworks has a band saw able to cut up to 24” of wood thickness.

Band saws are also capable of making tightly curved cuts, depending on the blade width. The tables can tip so that a bevel, or a combination of a curved cut with a bevel can be made. They are not a full substitute for a table saw, but if you are limited in budget and space, a band saw can cover a greater range of cuts.

Wide Belt Sander Training

Wide belt sanders have a wide sanding belt on a pair of rollers above a height adjustable feed table. Wood or other material is run between the bottom of the sanding belt and the top of the feed table with the space between set very slightly less that the wood thickness. Wide belt sanders produce a very flat smooth surface in a fraction of the time it takes to sand with portable sanders.